Monday, April 29, 2013

Buttermilk Muffins

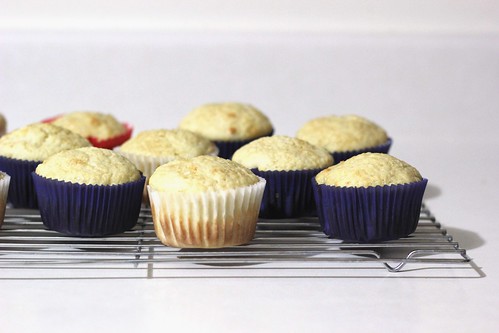
I like the above picture.  I know it's not that pretty,  not even all that appetizing, but for whatever reason, I like it.  I think it may be the Willy-Wonka-esque nature of it.  In a field of almost complete white, there are our muffins.  Plain simple muffins in a field of plain simple white.

Which is great and all, because sometimes you need that ideal, when life is never really plain and simple.  Case in point, last weekend Ben and I want on a long hike.  The weather was gorgeous, the sun was out for most of it and Lord knows I needed the 7 miles worth of exercise. It should have been plain and simple, but when we were in the home stretch (seriously, mile marker 6.75) suddenly, I need to use the bathroom.  Not just a little.  Not just soon.  NOW.  Out loud I giggled that we better hurry up cause I needed to use the restroom, but  in the quiet of my brain?  In there, it was seriously considering if that tree over there would be big enough to block me from view.  And drat, why was everything still so dreary and dead looking?  Where are all the leaves to hid my naked backside?  And most importantly, at what age does it become unacceptable to squat and go potty in the woods?  
Thank goodness that Ben, after hearing my nervous giggle and seeing the frantic panicked look on my face, realized that this was not a normal bathroom situation.  He ran the remaining quarter mile ahead to the car as I waited precious yet painstaking minutes till my knight  in shining gym shorts (?) came to save me in his pretty blue Subaru.     
This post did not start out with the intention of me telling the story of how I almost had to throw away my gym shorts.  I could have had a plain simple post about plain simple muffins.  But like I said, it never really is about plain and simple.  And so instead, I took the option of telling an internet full of strangers the story of how I almost pooed my pants at the ripe old age of twenty five.  And that's what life is about, or so I think.  Happy Monday people.


Buttermilk Muffins

So, the story behind these is simply that I had some leftover buttermilk in my fridge I was determined to use.  And I wanted to bake.  And I also had very strong feelings about not going to the grocery store.  So, after some browsing and searching on Pinterest, these satisfied all 3 criteria.  As sort of mentioned above, these muffins are plain and simple.  Quick to throw together and right into the oven they go.  They're like a less complex version of buttermilk biscuits, if you don't have the time to put into making biscuits.  Plain and simple.

2 c. (250 grams) all purpose flour
⅛ c. (25 grams) granulated sugar
2 tsp baking powder
¾ tsp kosher salt
¼ c. (4 tablespoons) unsalted butter, melted and cooled
1 egg
1-¼ c. buttermilk
Turbinado sugar to dust (Sugar in the Raw)

Makes 12 muffins

Preheat oven to 400 degrees.  Prepare a muffin tin with paper liners, or grease with cooking spray.

Whisk together all dry ingredients.  In small bowl or measuring cup, combine melted butter, egg and buttermilk.  Mix well.  Create a well in the middle of dry ingredients.  Pour in the wet ingredients and stir until just combined.  The batter will be thick and a little lumpy.

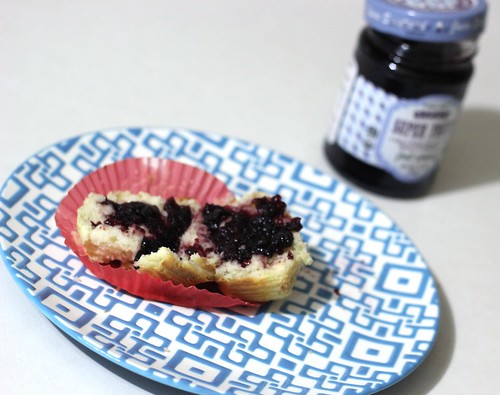
Pour batter into prepared muffin cups, filling to about 2/3rds the way full.  Sprinkle muffins lightly with turbinado sugar.  Bake at 400 for 22-25 minutes, until muffins are set and edges have turned golden brown.  Serve warm with butter and jam.

Thursday, April 11, 2013

Beer Braised Carnitas


I got a little super nerd excited when I noticed that this post was number 144.  Why?  Because that is 12 squared.  Not that 12 has any real meaning for my either, I just think 144 is a pretty cool number.  Yeah, I am a dork.  One of my favorite books is Fermat's Enigma.  The college essay I wrote that got me into Notre Dame?  Completely 100% based on my love of math.  I am still absolutely certain that that is the reason I got accepted.  I just really like math.  Hopefully that wasn't too much of a weird insight into how my somewhat nerdy brain is wired, that's just what popped into my head as I opened up this post, so I decided to share... Anyways, on to why you are really here, the carnitas!


There are occasionally times when I feel like I let my last name down.  I am Mexican.  Alright, I am a quarter Mexican.  But even so, I always feel a twinge of guilt when I reach for a jar of salsa, especially when I have my great-grandma Tilly's recipe sitting in the homemade cookbook on the counter.  Which is, I will admit (oh, the guilt!), ridiculously easy to make.  When I am feeling particularly shameful about my cultural negligence  I usually make Ben take me to the local taquerio where I can find a little solace in ordering a proper Mexican taco (corn tortillas, none of this cheese, sour cream, lettuce nonsense, simply topped as it should be with diced white onion, cilantro and a hearty squeeze of lime).


Other days, things are little more drastic, and I can go no longer with besmerching my good Mexican last name.  Call me a drama queen if you will, but good things usually come from these drastic measures.  Good things like corn tortillas.  And, most recently, these carnitas.  These heaven sent, lightly spicy, fall apart melt away goodness, carnitas.  Now, this is something my one quarter Mexican self can be proud of, just please ignore the fact that I did use store bought corn tortillas...


Beer Braised Carnitas
Adapted, in words only from Feb. 2013's Bon Appetit

There are 2 things you should take away from this recipe.  One is that carnitas, of any type, are usually  straight forward and easy.  There are only 5 ingredients!  Here's the gist: you take some pork, cut it up and boil it all day long until it melts apart.  Then you brown it in the very same pot after all the liquid evaporates.  For 20 minutes of prep work and a few hours on the stove, you get a pot of gorgeous, red, flavorful meat.  Two?  This is jaw-droppingly delicious.  Big Green Cookbook approved.

2 dried New Mexico chiles
4 lbs. skinless, boneless pork shoulder, cut into 2 inch hunks
12 oz lager (I used Modelo Especial)
4 garlic cloves, crushed
4 tsp. kosher salt

In large dutch oven, over medium heat, toast the chilies on both sides, until they have puffed up and darkened, about 2 minutes.  Remove from pot and let cool.  Once chilies are cool enough to handle, cut in half long ways and discard the stem and seeds (the more seeds you leave in, the more spice you'll find your dish has).  Return to dutch oven and add all the remaining ingredients, plus 1 cup of water.  Bring to a boil, then reduce the heat to a simmer.  Cover the pot and let simmer, stirring occasionally, until pork falls apart at the touch of a fork.  This took me about an hour and a half.

Once the pork is fork tender, remove the lid of the pot and raise the heat slightly, bringing the liquid to a slow boil.  Stirring occasionally, continue to boil until the liquid evaporates completely, about 25 minutes.  Using a wooden spoon, continue to allow pork to brown (it will naturally start shredding apart).  Stir continuously and scrape up the browned bits of goodness from the bottom for another 10-15 minutes.

Finally, add about 1 cup of water to the dutch oven.  Bring to a boil and scrape up any remaining browned bits of goodness from the bottom.  Serve with corn tortillas and a smile!

For instructions on making ahead of time (up to 3 days!), see BA's website.

Thursday, April 4, 2013

Cinnamon Sugar Almond Butter


I am engaged.  I know that I kind of threw that tidbit of information in at the bottom of a random post about some yummy lemon chicken soup quite some time ago, but really it probably deserves a little more attention than just a emboldened line at the very end of a post.  So in fairness, it now gets to start it's own post.  Here we go:

We're engaged!  Like, to be married!  Living happily ever after with lumberjack Ben!  


That was our first official picture as an engaged couple.  In true scatter-brain form, I of course forgot to post with my left hand (now sporting the gorgeous diamond ring) in front.  And Ben forgot to put down our shopping bags with the fresh asparagus for Christmas dinner and my cranberry cream loose leaf team.  Preferably, I would have made Ben take off his bulky Northface winter coat and maybe even have tied the belt of mine.  I know it's not perfect.  It may not be black and white/surprise hidden photographer/Pinterest worthy, but to me, it is one of the best photographs out there.  Because it's the first of many happy, silly scatter-brain pictures for years to come.

There is no segue from engagement and couple pictures to almond butter, or if there is my poor brain is too tired to be creative enough for it.  But, seeing as it is inevitable that wedding stress will start creeping in here, as it has in all other facets of my life, it seemed I should give you all a fair warning.  But I refuse to give you a post simply bragging about engagement.  Seeing as we are pretending, just as well as we can here, that this is a cooking blog.  So now it is almond butter's turn in the lime light (which I will give up begrudgingly).


Almond butter is a few things.  1, it is absolutely delicious, spread on bread, plopped in morning oatmeal, scooped from the jar and eaten from a spoon while standing in the light of the still open refrigerator.  2, it is adaptable.  I haven't actually tested this theory yet, but from what I hear, you basically add what you want and run with it.  Personally, I can't wait to run with it in this direction.  And finally, 3, it is dead simple to make.  Don't get me wrong, you will think you've screwed it up at least 7 times before the nuts actually come together as butter, but as soon as it's scooped in a jar and tucked away in the fridge, you'll look back and realize there was never any reason to worry.  The food processor will run for at least 8 minutes.  The almonds will become smooth as butter.  I promise.  I'm pretty sure it's science.

The batch I made for Ben and myself last in the fridge about 3 weeks.  I caught Ben several times sneaking the same spoon back into the jar for just another taste.  He was promptly scolded.  When I was home in AZ a few weekends ago, I made a batch for my mom.  Less than 2 weeks later, the household of 5 (minus one very cute, now over ONE YEAR OLD, nephew) had taken the jar down.  There's your proof.  It is good.  It is really good.  Buy the Costco sized bag of almonds.  You're going to need it.


And just in case you were wondering, the beard/lumberjack look is a relatively new one for Ben.  He's been sporting it since Thanksgiving.  Personally, I love it, but I appear to be in the minority.  He keeps threatening that he will shave it off though.  I told him I would need at least a week's notice in order to properly mourn the loss.


Cinnamon Sugar Almond Butter
Adapted from a Full Measure of Happiness, my latest blog crush

2 c. almonds
1/2 tsp. kosher salt
1 1/2 tsp. cinnamon
1 1/2 Tbsp. sugar

Preheat the over to 350 degrees.  On a rimmed sheet, spread out the almonds.  Toast in the oven until fragrant, 8 - 10 minutes.

Dig out the food processor.  When nuts are done roasting, dump in.  It's ok if you don't let them really cool first, just be aware that there's going to be some heat and steam coming out the top of your food processor.  Don't rest your hand there, it's going to get hot.  Add the remaining ingredients.  Turn the sucker on.

Don't bother pulsing.  You're going to have to run your food processor about 8 - 10 minutes before the almonds become almond butter.  It's ok if you freak out and think it will never happen.  It will, have some faith.  Keep going until you what you have looks like smooth peanut butter.  Stop every other minute or so to scrape down the sides of the food processor.

Once smooth and dreamy, pour into a jar with a tight fitting lid.  Keep refrigerated   Enjoy on everything--or straight from the spoon, no judgement here.